
How To Uninstall Steam on a PC
Steam platform is the best means to experience the latest and most modern games on your PC. Discovering storage space to install your favorite games can be challenging when juggling multiple programs on your PC. However, this presents an exciting opportunity to optimize your storage and make room for the games you love. By carefully managing your programs and prioritizing your gaming needs. You can make a dedicated space for your favorite games, ensuring a smooth gaming experience without storage constraints. Luckily, you can uninstall the Steam platform on your PC to find the space for downloading something else.
Steam is a popular digital platform published by Valve Corporation and lets users acquire gaming apps, live video streaming, chatting with friends, and other social features. The app allows users to download games with both free and paid subscriptions.
So, let us move to the topic and know how to remove the app from your PC.
Steps to Uninstall Steam on Your PC
When you remove the Steam server from your computer. It is important to note that it will remove all your connected games, files, protected data, and installable content you attained on Steam. While this ensures a clean and streamlined system, users can start fresh, explore new gaming experiences, and optimize their storage space effectively.
Here are the steps if you are removing Steam and all the games on it from your PC.
- Tap on the Windows icon you will see at the bottom right side of your PC’s screen to uninstall Steam.

- Then click on the settings icon from the popup Windows menu list.
![]()
- Navigate to the apps category from the popup settings page.

- After that, choose the apps and feature option on the apps category page.
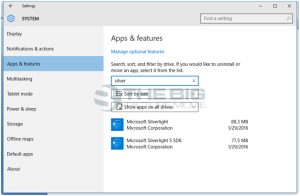
- Here scroll down and look for Steam in the apps menu list.
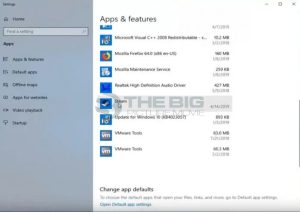
- Tap on the uninstall tab, choose the automatic option, and tap next.
- Then tap on the Finish tab to confirm the uninstallation procedure. That’s it.
Remember that the steps to uninstall the Steam server mentioned above are for Windows 10 users.
Steps to Save Steam Games Before Removing Steam from Your PC
If you remove Steam from your PC, it is highly recommended to back up your Steam games. Which allows you to conveniently restore them without re-downloading. Ensuring a seamless gaming experience and saving you valuable time. It is hands-on to ensure you don’t misplace your progress and can easily reinstall later.
Here we have shared the steps to save your Steam games.
Hover over to the Steam folder > Steam apps folder > Select the games you want to keep and move them to the folder you want them to save.
What Makes You Think to Uninstall Steam on Your PC?
- The steam server is incompatible with other connected applications, which can create compatibility issues and limitations in terms of functionality.
- Unfortunately, the service hangs frequently and does not live to the anticipated level of performance, leading to disappointment and frustration for users.
- The steam server is not listed in Windows settings, or the control panel adds to the difficulty of the uninstallation process, causing confusion and inconvenience.
- The procedure to uninstall runs long without concluding resulting in further frustration and consuming the valuable time for users attempting to remove the Steam server.
- After deleting the server, some traces can still be found on the PC. Indicating incomplete removal and potential remnants that may affect system resources.
- It is concerning to note that some users or internet sites repute the server as hypothetically malicious, raising doubts and potential security concerns about its presence on the system.
Conclusion
That’s a quick walkthrough on how to uninstall Steam on a PC.
If you have any queries regarding removing the steps, feel free to give your thoughts in the comment section.
Editor’s Recommendation
Related Posts

How to Text Someone Who Blocked You on iPhone iMessage

How To Make a Playlist On TikTok In 2 Ways