How To Take Apart Xbox One Controller
If you want to clean the interior, fix stick drift, change electronic parts, change battery connections, paint it, or just look under the hood can be necessary. Therefore it is obligatory to take your Xbox One controller gamepad apart.
However, seamless gameplay with your Xbox One gamepad is incredibly satisfying, enhancing your gaming experience. You can straightforwardly disassemble it with precise equipment.
So, if you want to know how to disassemble your Xbox 1 controllers, you are at the right place. This guide describes the easy steps to let us navigate to it.
How to Take Apart Xbox One Controller Joystick?
When you are confronted with an Xbox One gamepad joystick that is not working appropriately. After exhausting basic troubleshooting options. Such as checking for software updates and ensuring the battery is charged. The next exciting step is to disassemble the controller to address the issue.
It presents an opportunity to make a clean, organized workspace, setting the stage for a rewarding and fulfilling experience. Furthermore, you must also obtain the tools mentioned below if you don’t have them.
- T-8 Torx bit screwdriver
- Plastic Prying Tool
Here is how you can disassemble your Xbox One controller gamepad.
· 1st Step: Take Away the Batteries
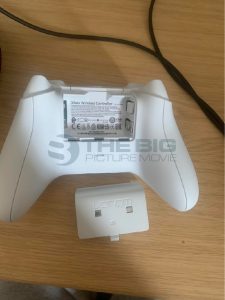
First of all, open the battery-operated section on the back side of the controller and take away the AA batteries from it.
· 2nd Step: Confiscate Battery Sticker

In the battery compartment, you will see a sticker label. Cut the sticker away, or you can force through the sticker with the Torx bit to access the concealed screw.
· 3rd Step: Eridcate 5 Screws from the Xbox One Controller
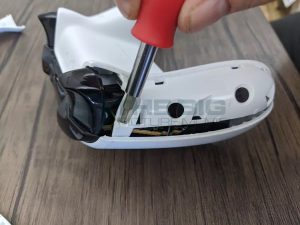
Use a T-8 Torx bit screwdriver, carefully seat it and remove the screw from the battery compartment. Make sure to apply even pressure to avoid stripping the screw.
Then skilfully excluded the two screws located at the bottom and tops of the sides underneath the plastic cover.
· 4th Step: Separate the Left & Right Grip Covers
With the plastic spudger or flathead screwdriver, gently separate the crease of the side of the controller cover. Slightly maneuver the controller along the crease to effortlessly remove the plastic covers on the back of the handle, revealing a sleek and comfortable grip.
When the cover has begun to separate, you can finish carefully pulling them off by hand. Duplicate the step with the other side of the grip cover.
· 5th Step: Remove the Plastic Front Cover of the Xbox One controller
When the screws and back panels are successfully detached, the plastic faceplate cover can be effortlessly slid off gently using your finger on the front of the controller.
· 6th Step: Remove the Back Plastic Cover

Now turn over the controller and delicately twist the remaining back plastic cover, ensuring a satisfying and rewarding experience during the process.
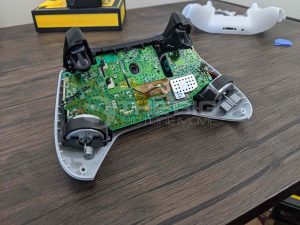
Now you have access to the rumble motors triggers and screws and take a look at the inner workings of your Xbox One Controller joystick. The controller has now been divided into 3 separate parts: a front faceplate, a backplate with a battery housing, and an inner body with the circuit board.
Hence, handling parts attentively is important to avoid misplacing any of them during the working procedure.
Final Thoughts
The gamepad controller of Xbox One is the best for the gaming experience; users can take it apart and fix it manually if they get damaged.
In this post, we will describe how to disassemble your Xbox One controller’s gamepad joystick apart in the step-by-step guide.
Let us know in the comment section if you want to know the reassembling process of your controller.
Related Posts

Which Tablet is Right for Me (2024)
How To Turn Off iPhone 14 Series